This post may contain affiliate links. Please read our disclosure policy.
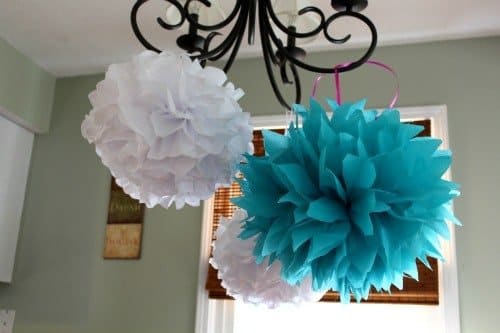
Here’s a simple How-To on making those gorgeous Dahlia Flower Tissue Paper Pom Poms you see in magazines and on the Internet. So easy, you’ll be looking for places to hang them around your home! They’re such a fun summer craft.
How To Make Tissue Paper Pom Poms Easily!

1. Start by stacking eight to twelve 20×30 inch sheets of tissue paper of all the same color.

2. Measure from the short edge of the paper up 1.5 inches and 3 inches and mark at each spot.

3. Start to accordian fold the paper from the short end all the way up the length of the paper in 1.5 inch increments.

4. Fold the paper in half to find the center and tie a ribbon, fishing line or floral wire around the center to hold the paper in place.

5. Using scissors, trim the ends of the paper into a point or rounded.

6. Start separating the tissue paper layers from each other, pulling toward the center CAREFULLY.

7. Pull the layers all the way around the pom to create the full Pom look you’d like.

8.. Using a ribbon or fishing line, hang the newly made Pom from the ceiling or light fixtures.

That’s it! You can now create beautiful Pom Poms on your very own!
If you like this post…check out my post on making a Cupcake Wrapper Door Number for your next party!


These are so cute! Thanks for sharing! I’m your newest follower 🙂
Super easy yielding a great result. That’s the best.
You know, I actually thought this project would be so difficult but thank you for proving me wrong. :]
These are so cute and I want to make them for my daughters 2nd birthday! Where did you find your 20×30 tissue paper? I have only been able to find 20×24 at best.
I found my tissue paper at Target. But, really any large size paper will do!
These are great. I have to remember this for the next baby shower I go to and Imake the paper plate hat.
This is great. I have to remember this the next baby shower when I make the hat for the moms.
I love these! Thanks for a great tutorial. I’ll make them for a cinco de mayo celebration.
I love these and can’t wait to try them. Thanks for this pattern
These are really cool! I may make a few bright shiny ones for the Elvis party I am throwing next week.
Vegas style, lol
I’ve loved making these since I was a little girl. 🙂
This is a great, simple tutorial.
We used to make these from Kleenex, way back in the day and decorate the cars for a family wedding procession…we made tons of them. Looks very nice huge like this for indoors. Love it.
They look awesome and so easy to do. Will have to give them a go for my little girl’s 2nd birthday party in a couple of days.
What a great idea!!! They look wonderful and fresh!!!
Hugs,
Susan
So cute! I think I’ll have to make these for my friend’s 40th birthday celebration. Thanks for the great post.
http://www.craftrunwag.blogspot.com
twitter: @craftrunwag
Nice, I was looking for a craft last night, that I could do with what I had on hand, and I found this. I made one with pink and green tissue, it looks great. My cat is looking wistfully at it probably wishing it was on the ground.
Now I know what was missing in my life. LOL!!!
Love,
Pop
OH and now you know what you’re getting for your Father’s Day! haha!!